Showing posts with label jorel. Show all posts

Thursday, November 19, 2009

...with Jorel Hologram


I hung it with 2 fishing lines, which are connected to 2 rare earth magnets on the ceiling (I work in a converted air plane hangar, everything is steel.)

IT IS DONE!!!


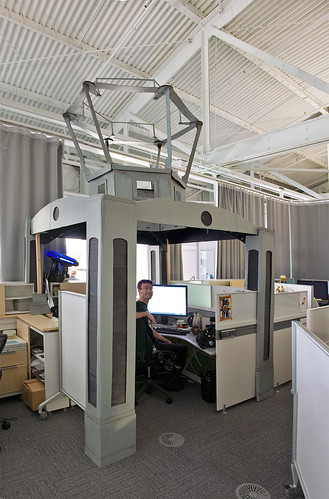
After months and months of planning, constructing, and wiring, I'm happy to report my Fortress of Solitude desk/cubicle modification is complete. Took almost 2 full days to get all the paper crystals rolled up, taped, and mounted. Since there were 3 different sizes of acrylic crystal I had to roll with a different template every time. Took much longer than I thought.

These images are WITHOUT the Jorel hologram.


I used the bottom knobs of small Sprite bottles to cap the open LEDs to give them a nice green Kryptonian tint.


photos courtesy of Michael Clemens.

Monday, November 2, 2009

JOREL COMPLETE!

After finishing the face sculpt, I baked it in my home oven, double the time the box suggested since it was over 4 boxes of Super Sculpy.

Once baked, it was ready for vaccuuform.


Never used one of those machine before, it was awesome. It shrinks around the object in a second once you flip the switch.

Here it is incased in the plastic before I cut it out.


Ir wasnt easy getting it out, once the original was free for the plastic mold, I used a Drummel tool to sand the outside edges and sculpt the back edge a little bit more.

Monday, September 28, 2009

UPDATE

Jorel head JUST ABOUT complete. Just need to smooth some patches, then its BAKE TIME! After its baked i'll be bringing it to work to have it vaccuuformed with clear plastic. I'll try to get some progression pictures of the vaccuuform process... i've never done it.


I've also completed 1 of the 4 panels. Its taken me more months than i assumed, but ever aspect of this project has been a learning experience.

I started by soldering all my white LEDs with resistors, then splitting them with + wire and the - wire so they would work in a string series.


It was quite a challenge holding these foundation pieces up while drilling holes for the LEDs. Since I glued the acrylic tubes on first, I had to drill from the back side.

I then plotted the course for the LEDs on the bottom side with a marker. Figured at some point it would just be a rats nest of wires, I know how I work, so i planned ahead.


Using a hot glue gun, I secured the LEDs into the holes via the back side. About 3 - 4 at a time. This was tedious work.


Fully wired, soldered, and shrink tubed... i cross my fingers and plugged it in....
ILLUMINATION!!!!!!!!!!!!!!!!!!!!


I brought that one piece into work to final assembly. Works beautifully, just as I imagined it. Image below is still without paper tubes/crystals. Except for one on the left in the foreground.


And just to show how I've mounted it going AWAY from the desk...
Used metal strips with holes so i could adjust it, in the end, I just bent them to get it level. And those metal strips fit perfectly into these ridges built into the cubicle. Most of the weight is resting on the front part, sitting on the cubicle wall. Just hope we dont have an earthquake. I'll be safe, but it could get destroyed if it fell.


ONE PANEL DOWN................ THREE TO GO!

Thursday, June 25, 2009

Until I get some work in progress shots, thought I would share some of my reference material.

My Fortress project will consist of 3 parts.

1) The main fortress crystals... rolled tubes of paper, slid over acrylic tubes cut at a 45 degree angle, then mounted to a wood foundation. LEDs will be placed in the acrylic mounts, with a few random green pockets of LEDs.


These 2 pictures below gave me the idea of using Styrofoam chunks for ripped up artic ice, to cover up all the construction flaws and LED sources, and adding yet another element of bad'assery.


2) The crystal console... in which Superman talks to his father, Jorel. (Which will act as a corner desk lamp.) Hoping to get an acrylic crystal made to insert into one of the console tubes.


3) And lastly, Jor'el himself. Hoping to sculpt it out of clay, then vacuform melt a sheet of clear styrene plastic (for hologram effect), while hovering over my 2 monitors, centered below the Fortress's cathedral vaulting.


*photos courtesy of www.capedwonder.com*

Wednesday, June 24, 2009

Genesis.

I'd hate to admit it, but I work in a cubicle. And its pretty "IKEA". White, Gray, and Wood. Some people at work decorate, put out Star Wars figurines, pictures of the wife and kids, and so forth. Others go vertical.

But first, a lil back story...
I work in an old Air Force hangar converted into office space. Much of the companies decorations involve WW2 Aviation themes. An employee (JD) on the second floor took this "decoration" theme to the next level; by building a replica air plane hangar around his cubicle, completely made out of cardboard. No joke.


This certain individual (JD) has inspired me to construct vertically also. And the first thing that came to mind was Superman's Fortress of Solitude. With no idea of how, or what materials I would be using, I started some rough blueprints. Since I work for a pretty corporate company, I had to keep "office safety" in mind. Meaning, I couldn't have solid crystals made of plastic, or any other SOLID or HEAVY materials that could fall on me during an earthquake or something.

So in homage to JD's air plane hangar, I plan on making all of the crystals out of a paper products (rolled tubes of paper). The foundation will be built out of wood and acrylic tubes. The acrylic tubes will act as mountings for the paper crystals. And I chose acrylic because I plan on illuminating them with LEDs.

I will post some progress pictures soon.