Tuesday, August 4, 2009

"...My son"


When I get tired of cutting Styrofoam, I move to the clay. I've been inching my way closer to a decent "blocking" of my Marlon Brando Jorel head. Which I will Vacuform clear plastic over, leaving a clear "hologram" Jorel mask. Just to give you an idea, here's an example I found of a clear/transparent mask.


My Jorel face will be hanging from the cieling, suspended over my monitors, hopefully reflecting and refracting the fortress crystals around it.


Image above shows most of the mass is made of foil. I'm only creating a mask, not a solid head.
The weird looking worm is the start of the hair line. His profile still not mathcing Brando's, spent most of the time on the front, now I need to work his cheeks into something a little more Brando like.


Above is the latest and greatest. Hair curl is just temp placement. The eyes I will most likely do last, since I use his ocular cavities as thumb leverage when tryin to smooth out all the lumps in the clay.

Friday, July 24, 2009

Breaking ground(ice)


Finally started on the detail of the crystals breaking through the arctic ice. At work, I sent out an email asking for any styrofoam.. by the end of the week, I had about 3 trashbags full of non biodegradable goodness! Using a kitchen knife, I sat on the floor, and just carved for hours. Using fast holding TACKY glue to adhere the foam to the wood, I'm able to cover small portions of each panel in about 1 hour segments. Tried watching tv while doing this, and almost lost a thumb. Best to just play music.

Thursday, July 9, 2009


4th of July was a day of progress. Spent most of the day mounting and gluing the acrylic tubes to the foundation. The image above shows the 3 sizes of crystal. I started with 2, then went back to TAP PLASTICS to buy a second round of the medium and large, and figured a smaller tube would make good filler.


Here is 1 of 4 foundation pieces (the underside). They will rest on my cubicle walls. 1 piece works like a shelf, just sits on another shelf. The other 3 have to sit in a cubicle wall only i inch wide. Mostly made of cheap wood, wood glue, and screws. I was worried about sliding, so using foam window sealer as padding. (Not the cleanest screwing or glue job, i know but you wont be seeing the underside.) Then slapped a basic white coat on the sides that will show.


I've been using E6000 to mount the tubes to the wood foundation. Works like amazing. It takes about 30 minutes for the bond to hold, then you have about an hour to nudge, and adjust the angle before its too late.

I used heels of shoes to hold down the tubes while the glue drys. A shoe was the only object in my house that could hold these. Since i have 60 crystal tube mounts, I figured one at a time, by hand, would have taken forever. This way, I was able to do about 6 at a time. Using a triangle ruler made it really easy to lay down a bunch of guidelines. None of them are perfect, just eye balled matching the tube to the 45 degree line. But organic is good.


It's a shame these will all be covered by paper.
Looks cool just like this.


As of today, this is where I am. All 4 pieces of the foundation, with MOST of the tubes glued down. I have a few spare (6-8) pieces left, Once i start wiring the LEDs I may find room for 1 or two more.

The LED phase will take some time. Seeing how I've never wired anything before, I must bone up on research so i don't set this thing aflame the first time i turn the lights on. Ebay shopping for LEDs as we speak... or as i type.


Thursday, June 25, 2009

Until I get some work in progress shots, thought I would share some of my reference material.

My Fortress project will consist of 3 parts.

1) The main fortress crystals... rolled tubes of paper, slid over acrylic tubes cut at a 45 degree angle, then mounted to a wood foundation. LEDs will be placed in the acrylic mounts, with a few random green pockets of LEDs.


These 2 pictures below gave me the idea of using Styrofoam chunks for ripped up artic ice, to cover up all the construction flaws and LED sources, and adding yet another element of bad'assery.


2) The crystal console... in which Superman talks to his father, Jorel. (Which will act as a corner desk lamp.) Hoping to get an acrylic crystal made to insert into one of the console tubes.


3) And lastly, Jor'el himself. Hoping to sculpt it out of clay, then vacuform melt a sheet of clear styrene plastic (for hologram effect), while hovering over my 2 monitors, centered below the Fortress's cathedral vaulting.


*photos courtesy of www.capedwonder.com*

Wednesday, June 24, 2009

Genesis.

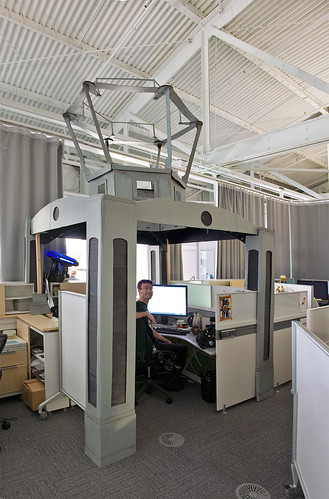
I'd hate to admit it, but I work in a cubicle. And its pretty "IKEA". White, Gray, and Wood. Some people at work decorate, put out Star Wars figurines, pictures of the wife and kids, and so forth. Others go vertical.

But first, a lil back story...
I work in an old Air Force hangar converted into office space. Much of the companies decorations involve WW2 Aviation themes. An employee (JD) on the second floor took this "decoration" theme to the next level; by building a replica air plane hangar around his cubicle, completely made out of cardboard. No joke.


This certain individual (JD) has inspired me to construct vertically also. And the first thing that came to mind was Superman's Fortress of Solitude. With no idea of how, or what materials I would be using, I started some rough blueprints. Since I work for a pretty corporate company, I had to keep "office safety" in mind. Meaning, I couldn't have solid crystals made of plastic, or any other SOLID or HEAVY materials that could fall on me during an earthquake or something.

So in homage to JD's air plane hangar, I plan on making all of the crystals out of a paper products (rolled tubes of paper). The foundation will be built out of wood and acrylic tubes. The acrylic tubes will act as mountings for the paper crystals. And I chose acrylic because I plan on illuminating them with LEDs.

I will post some progress pictures soon.